Introduction
If you’ve ever wondered how do I set up a DSLR to take photos of the stars, you’re about to discover that capturing the night sky is more accessible than you might think. Learning how do I set up a DSLR to take photos of the stars opens up an entirely new world of photography, where you can capture the Milky Way, meteor showers, constellations, and the breathtaking beauty of our universe.
Astrophotography might seem intimidating at first, but with the right camera settings, basic equipment, and a clear understanding of the fundamentals, anyone with a DSLR camera can start photographing stars tonight. This comprehensive guide will walk you through every step of the process, from choosing the right location to editing your final images.
Whether you own a Canon, Nikon, Sony, or any other DSLR brand, the principles remain the same. You don’t need expensive equipment or a telescope to get started. Your DSLR camera, a sturdy tripod, and a dark sky are all you need to begin your astrophotography journey.
How Do I Set Up a DSLR to Take Photos of the Stars for the First Time?
Taking your first star photos requires understanding that night photography operates completely differently from daytime shooting. Your camera needs to gather as much light as possible from distant stars, which means long exposures, wide apertures, and high ISO settings.
Your first-time setup checklist:
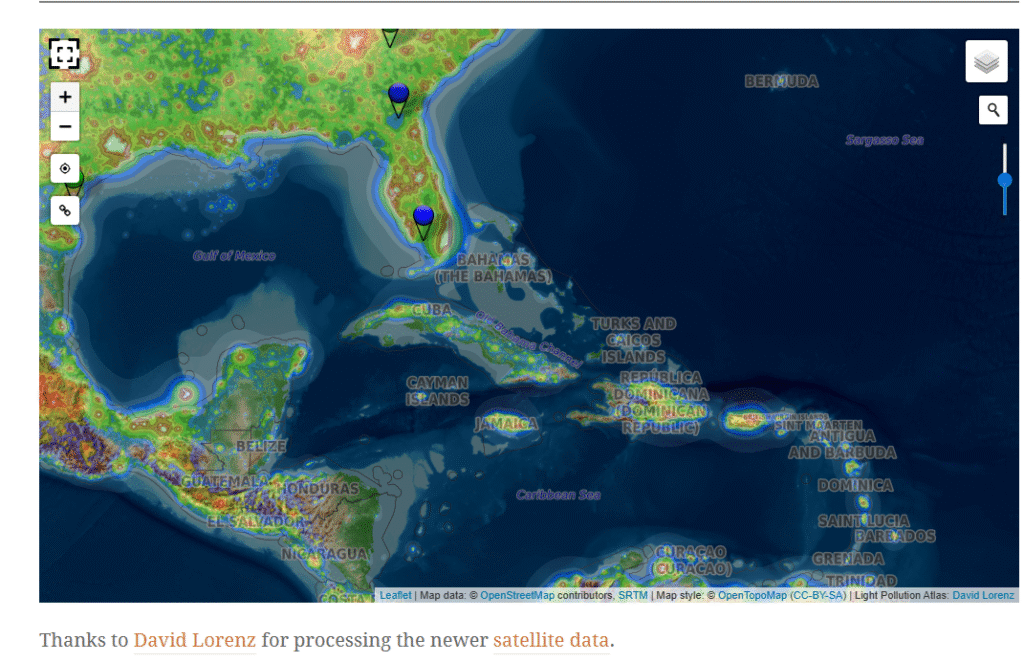
Start by finding a location away from city lights. Light pollution is your biggest enemy in astrophotography. Even a small amount of artificial light can wash out the stars and reduce the quality of your images. Use apps like Dark Sky Finder or Light Pollution Map to locate dark sky areas near you.
Arrive at your location at least 30 minutes before you plan to start shooting. This gives your eyes time to adjust to the darkness and helps you set up your equipment safely. Bring a red flashlight or headlamp, as red light preserves your night vision better than white light.
Mount your DSLR on a sturdy tripod. Handheld star photography is impossible because you’ll be using shutter speeds of 15 to 30 seconds. Any camera movement will result in blurred images. Make sure your tripod is stable on the ground and won’t shift during long exposures.
Switch your camera to full manual mode. Auto mode won’t work for star photography because cameras struggle to autofocus and meter properly in darkness. You’ll be controlling every aspect of the exposure yourself.
Attach your widest aperture lens. A lens with f/2.8 or wider is ideal, though f/3.5 or f/4 lenses can still produce good results. Wide-angle lenses in the 14mm to 24mm range work best because they capture more of the sky and allow longer shutter speeds before stars start trailing.
Turn off image stabilization. When your camera is mounted on a tripod, image stabilization can actually introduce blur by trying to compensate for movement that isn’t there.
Essential Equipment You Need for Star Photography
You don’t need to spend thousands of dollars to photograph stars, but certain equipment makes a significant difference in your results.
Camera body: Any DSLR camera will work, but newer models with better high ISO performance produce cleaner images with less noise. Full-frame sensors perform better in low light than crop sensors, but crop sensor cameras are perfectly capable of capturing beautiful star images.
Lenses: Your lens choice matters more than your camera body. A wide-angle lens with a large maximum aperture is essential. The ideal lens has a focal length between 14mm and 24mm with an aperture of f/2.8 or wider. Popular choices include the Rokinon 14mm f/2.8, Samyang 24mm f/1.4, Canon 16-35mm f/2.8, and Nikon 14-24mm f/2.8.
Tripod: Invest in the sturdiest tripod you can afford. Cheap tripods wobble in wind and can’t support your camera steadily for 20 to 30-second exposures. Carbon fiber tripods are lighter and more stable than aluminum ones, making them ideal for hiking to dark sky locations.
Remote shutter release or intervalometer: Touching your camera to press the shutter button causes vibration that blurs images. A wired or wireless remote shutter release eliminates this problem. Many cameras also have built-in intervalometers for time-lapse photography.
Extra batteries: Cold night air drains camera batteries faster than normal. Long exposures also consume more power. Always bring at least two fully charged spare batteries.
Red headlamp or flashlight: White light ruins your night vision and can interfere with other photographers nearby. A red light allows you to see your camera settings without affecting your ability to see stars.
Warm clothing: Even summer nights get cold when you’re standing still for hours. Dress in layers and bring a warm jacket, hat, and gloves.
How Do I Set Up a DSLR to Take Photos of the Stars Using Manual Settings?
Manual mode gives you complete control over your camera’s exposure settings, which is absolutely necessary for star photography. Here’s how to configure each setting:
Step 1: Switch to Manual Mode
Turn your camera’s mode dial to “M” for manual. In this mode, you control the ISO, aperture, and shutter speed independently.
Step 2: Set Your Aperture
Open your aperture to its widest setting. If your lens maximum aperture is f/2.8, set it to f/2.8. If you have an f/1.8 or f/1.4 lens, use that setting. A wider aperture allows more light to reach your sensor, which is critical when photographing dim stars.
Step 3: Adjust Your ISO
Start with an ISO setting between 3200 and 6400. Modern DSLR cameras handle high ISO remarkably well, and you need the extra sensitivity to capture faint stars. If your images are too dark, increase the ISO. If they’re too bright or grainy, decrease it.
Step 4: Calculate Your Shutter Speed
Your shutter speed depends on your lens focal length and whether you want to capture stars as points of light or star trails. For pinpoint stars, use the 500 rule (explained in detail later). Generally, you’ll use shutter speeds between 15 and 30 seconds.
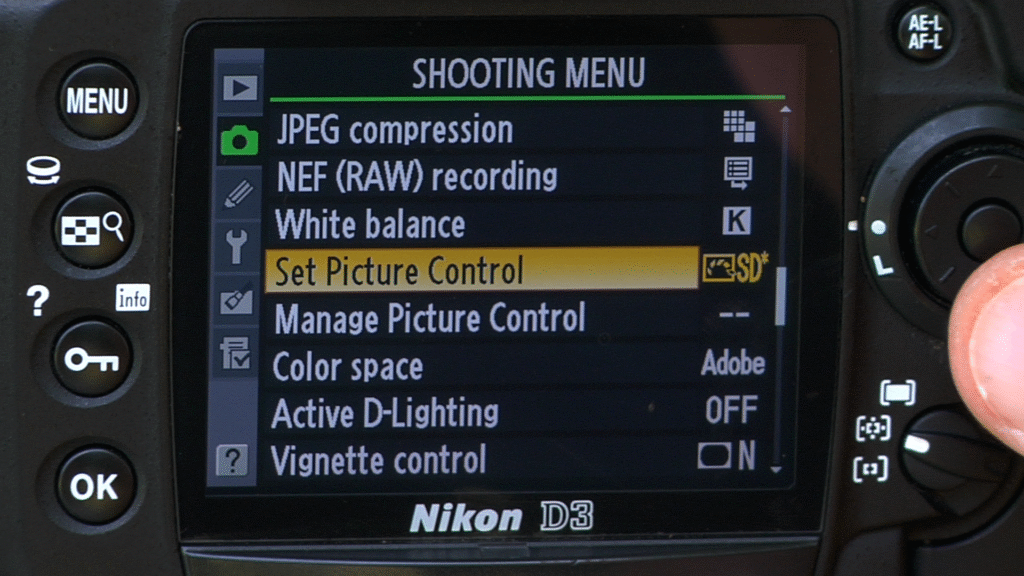
Step 5: Shoot in RAW Format
Always shoot in RAW rather than JPEG. RAW files contain much more information and give you far greater flexibility when editing. You can recover details in shadows and highlights that would be lost in JPEG files.
Step 6: Turn Off Long Exposure Noise Reduction
While long exposure noise reduction can help reduce noise, it takes a second exposure of equal length with the shutter closed, doubling the time between shots. This makes shooting inefficient and can cause you to miss important moments like meteors.
Step 7: Set White Balance
Set your white balance to 3400K to 4000K for a natural-looking night sky. You can adjust this later in post-processing if you shot in RAW, but starting with the right white balance helps you preview images more accurately in the field.
Understanding the Exposure Triangle for Night Sky Photography
The exposure triangle consists of three elements that work together to create a proper exposure: ISO, aperture, and shutter speed.
ISO sensitivity determines how sensitive your camera sensor is to light. Higher ISO values make your sensor more sensitive, allowing you to capture fainter stars. However, higher ISO also introduces more noise (grain) into your images. For star photography, you’ll typically use ISO values between 1600 and 6400, depending on your camera’s noise performance and how dark your sky is.
Aperture controls how much light enters through your lens. It’s measured in f-numbers, where smaller numbers mean wider openings and more light. An aperture of f/2.8 lets in four times more light than f/5.6. For star photography, you want the widest aperture your lens offers, typically between f/1.4 and f/4.
Shutter speed determines how long your camera sensor is exposed to light. For star photography, you’ll use long shutter speeds between 10 and 30 seconds. Longer shutter speeds gather more light but can cause star trailing due to Earth’s rotation.
These three settings must balance each other. If you increase shutter speed (making it faster), you need to compensate by opening your aperture wider or increasing your ISO. If you stop down your aperture to make it smaller, you need a longer shutter speed or higher ISO to maintain the same exposure.
How Do I Set Up a DSLR to Take Photos of the Stars Without a Telescope?
Many beginners assume they need a telescope to photograph stars, but your DSLR and a good lens are all you need for stunning wide-field astrophotography.
Wide-field astrophotography captures large sections of the night sky, including the Milky Way, constellations, meteor showers, and the aurora borealis. This type of photography doesn’t require a telescope and often produces more dramatic images than telescopic views.
The advantages of DSLR-only star photography:
Your camera lens can capture context that telescopes cannot. When you photograph the Milky Way arching over a landscape, you create images that show the relationship between Earth and cosmos. This style of astrophotography tells a story that pure telescopic images cannot convey.
DSLR photography is more portable and spontaneous. You can grab your camera and tripod and start shooting within minutes. Telescope setups require more time, precise alignment, and often tracking mounts to compensate for Earth’s rotation.
Wide-angle lenses excel at capturing meteor showers, satellite passes, and the International Space Station. These subjects move too quickly for telescopic photography but make dramatic wide-field images.
Best subjects for telescope-free star photography:
The Milky Way core creates spectacular images during summer months in the Northern Hemisphere. Position your camera to capture the galactic core rising over interesting landscape features like mountains, trees, or rock formations.
Constellations tell ancient stories written in stars. Photograph Orion in winter, Scorpius in summer, or the Big Dipper year-round. Use shorter exposures of 5 to 10 seconds with lower ISO to prevent brighter stars from becoming overexposed white blobs.
Meteor showers produce shooting stars that streak across the sky. During peak meteor shower nights like the Perseids in August or Geminids in December, point your camera toward the radiant point and take continuous long exposures. You’ll eventually capture meteors streaking through your frame.
The aurora borealis or northern lights create dancing curtains of green, pink, and purple light. Use shorter exposures of 3 to 8 seconds with ISO 1600 to 3200 to capture the aurora’s motion and detail.
How Do I Set Up a DSLR to Take Photos of the Stars in Dark Sky Areas?
Finding truly dark skies transforms your star photography from ordinary to extraordinary. Light pollution from cities, towns, and even small communities washes out faint stars and reduces contrast in your images.
Understanding the Bortle Scale:
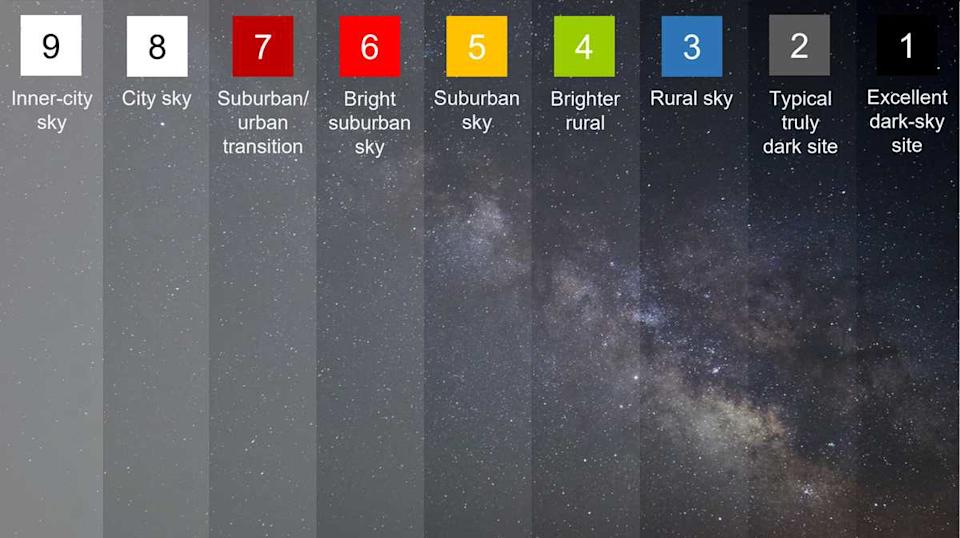
The Bortle Scale measures sky darkness on a scale from 1 to 9, where 1 represents pristine dark skies and 9 represents inner-city skies. For good astrophotography, you want to shoot in areas rated Bortle 4 or darker.
Bortle 1-2 skies are extremely rare and found only in remote wilderness areas far from civilization. In these locations, the Milky Way casts shadows and you can see your surroundings by starlight alone.
Bortle 3-4 skies are excellent for astrophotography and can be found in rural areas, national parks, and designated Dark Sky Reserves. The Milky Way is clearly visible and shows good detail even before post-processing.
Bortle 5-6 skies show some light pollution on the horizon but still allow decent astrophotography overhead. You’ll need more aggressive post-processing to bring out faint details.
Bortle 7-9 skies are urban and suburban areas where only the brightest stars are visible. Astrophotography in these locations is difficult and produces inferior results.
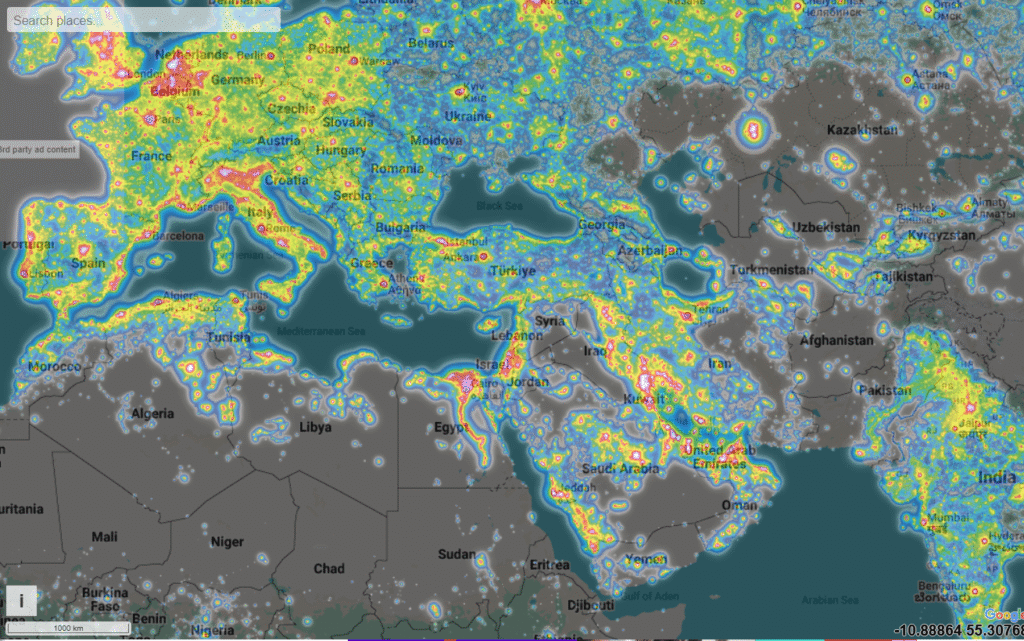
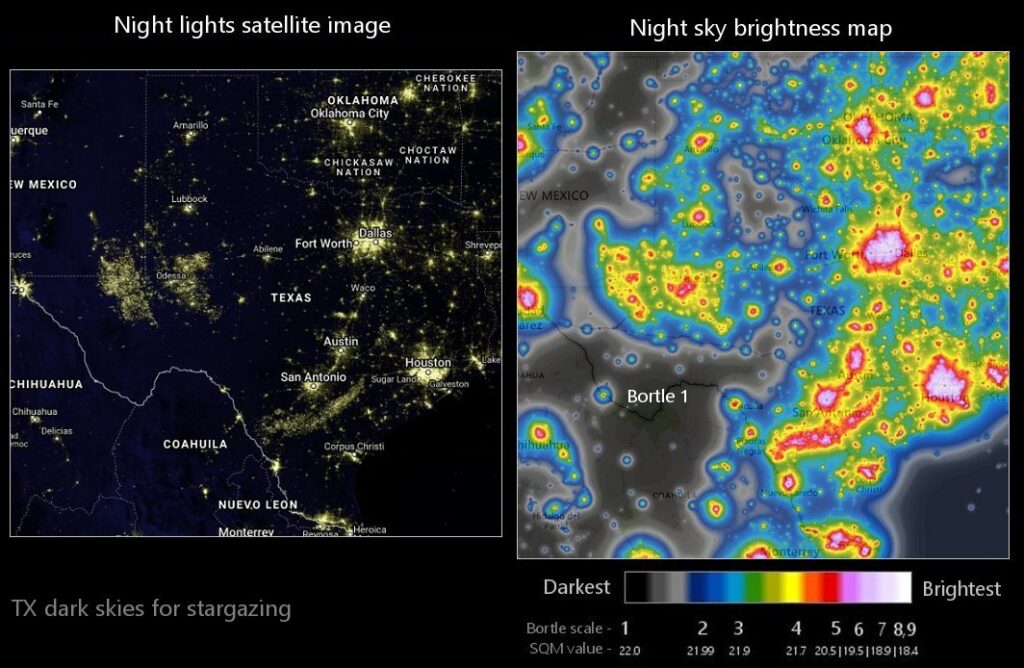
Finding dark sky locations:
Use the Light Pollution Map website or app to find dark areas near you. The map uses color coding where black and gray represent the darkest skies, and yellow, orange, and red represent increasing light pollution.
National parks, national forests, and wilderness areas often have excellent dark skies. Many offer designated astrophotography viewing areas with clear horizons and minimal obstructions.
Plan your shoot during the new moon phase. Even a crescent moon creates significant light pollution that washes out the Milky Way and faint stars. Use apps like PhotoPills or The Photographer’s Ephemeris to check moon phases and positions.
Camera adjustments for darker skies:
In truly dark locations, you can often use lower ISO settings around 1600 to 3200 while still capturing plenty of stars. Lower ISO produces cleaner images with less noise.
Slightly longer shutter speeds work in darker areas because there’s less light pollution to create a bright, washed-out sky background. You can push your exposures to 25 or 30 seconds without the sky becoming unnaturally bright.
Your aperture settings remain wide open regardless of sky darkness. You always want maximum light gathering capability when photographing stars.
The 500 Rule: Avoiding Star Trails
Stars appear to move across the sky due to Earth’s rotation. If your shutter speed is too long, stars will create short trails instead of appearing as sharp points of light. The 500 Rule helps you calculate the longest shutter speed you can use before star trailing becomes noticeable.

The 500 Rule formula:
Divide 500 by your lens focal length to get the maximum shutter speed in seconds.
For a 14mm lens: 500 ÷ 14 = 35 seconds For a 24mm lens: 500 ÷ 24 = 20 seconds For a 50mm lens: 500 ÷ 50 = 10 seconds
Adjustments for crop sensor cameras:
If you use a crop sensor camera, multiply your focal length by the crop factor before calculating. Canon and Nikon crop sensors have a 1.5x or 1.6x crop factor.
For a 24mm lens on a crop sensor camera with 1.5x crop factor: 24mm × 1.5 = 36mm effective focal length 500 ÷ 36 = 13.8 seconds maximum shutter speed
The updated NPF Rule:
Many photographers now use the more accurate NPF Rule, which accounts for aperture and pixel density. However, the 500 Rule remains a good starting point for beginners.
In practice, you might notice slight trailing even when following the 500 Rule, especially with high-megapixel cameras. Some photographers use a more conservative 400 Rule (dividing 400 instead of 500) or the 300 Rule for extremely sharp stars.
When to intentionally create star trails:
Star trail photography uses very long exposures from several minutes to hours, creating circular streaks as stars appear to rotate around the celestial poles. This technique requires different camera settings: use your lowest ISO (100 to 400), a smaller aperture (f/5.6 to f/8), and either extremely long single exposures or multiple shorter exposures stacked in post-processing.
Best Camera Settings for Different Night Sky Subjects
Different celestial subjects require slightly different camera settings for optimal results.
Milky Way photography settings:
The Milky Way galactic core offers the most dramatic astrophotography opportunities. Use these settings as a starting point:
- Aperture: f/1.4 to f/2.8 (widest available)
- Shutter Speed: 15 to 25 seconds (based on 500 Rule)
- ISO: 3200 to 6400
- White Balance: 3400K to 4200K
- Focus: Manual focus on infinity
Shoot during summer months when the Milky Way core is visible and position it near interesting landscape elements. The best time is a few hours after sunset or before sunrise when the core is high in the sky.
Constellation photography settings:
Constellations contain bright stars that can overexpose easily. Use these settings:
- Aperture: f/2.8 to f/4
- Shutter Speed: 8 to 15 seconds
- ISO: 1600 to 3200
- White Balance: 4000K to 5000K
- Focus: Manual focus on bright star
Shorter exposures and lower ISO prevent bright stars from blooming into white blobs while still showing dimmer stars.
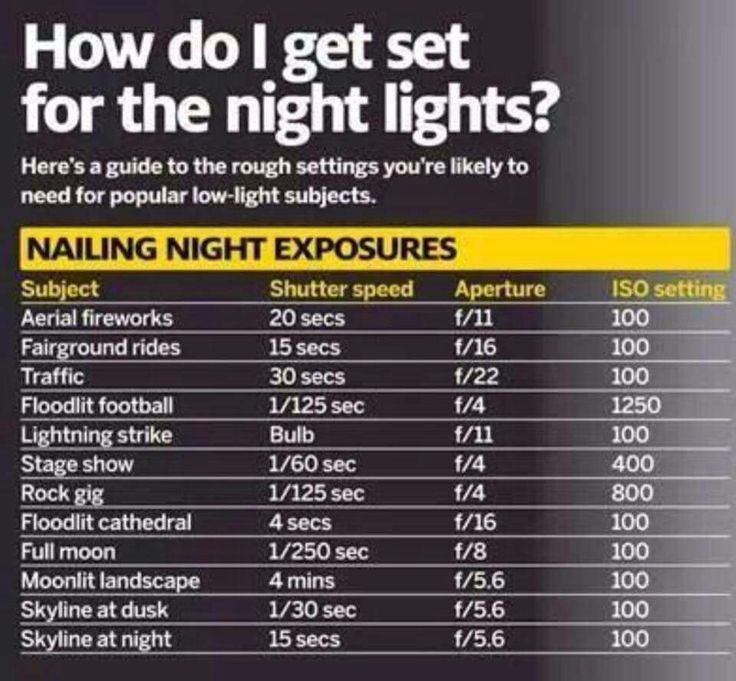
Moon photography settings:
The moon is surprisingly bright and requires different settings than deep sky objects:
- Aperture: f/5.6 to f/11
- Shutter Speed: 1/125 to 1/250 second
- ISO: 100 to 400
- White Balance: 5000K to 5500K
- Focus: Manual focus on moon’s edge
Use a telephoto lens (200mm or longer) to capture lunar surface details. A full moon provides the most light but creates harsh shadows. A crescent or half moon shows more dramatic surface texture.
Meteor shower photography settings:
Capturing meteors requires patience and continuous shooting:
- Aperture: f/2.8 or wider
- Shutter Speed: 15 to 25 seconds
- ISO: 1600 to 3200
- White Balance: 3800K to 4200K
- Focus: Manual focus on infinity
Point your camera toward the radiant point of the meteor shower and use an intervalometer to take continuous exposures throughout the night. You’ll capture several meteors over hundreds of frames.
Aurora borealis photography settings:
The aurora moves and changes rapidly, requiring faster shutter speeds:
- Aperture: f/1.4 to f/2.8
- Shutter Speed: 3 to 8 seconds
- ISO: 1600 to 3200
- White Balance: 3200K to 3800K
- Focus: Manual focus on infinity
Adjust shutter speed based on aurora activity. Faster-moving aurora requires shorter exposures to freeze motion and capture detail in the dancing lights.
Focusing Your DSLR for Sharp Star Images
Achieving perfect focus in darkness challenges even experienced photographers. Autofocus doesn’t work when photographing stars because there’s insufficient contrast for the camera’s autofocus system to lock onto.
Manual focus techniques:
Switch your lens to manual focus mode. Turn off autofocus on both your camera body and lens if applicable.
Find the brightest star or planet visible in your sky. Jupiter, Venus, Sirius, or Vega work well as focus targets.
Use your camera’s Live View mode and zoom in digitally to 10x magnification on the bright star. Many cameras allow you to magnify the Live View image by pressing a magnification button.
Slowly adjust your focus ring while watching the star on your LCD screen. The star will appear as a fuzzy blob when out of focus. As you approach perfect focus, the star will shrink to its smallest possible size.
The star appears sharpest when it’s the smallest point of light surrounded by the darkest background. If you focus too far, the star becomes slightly larger again.
Take a test shot and review it at 100% magnification on your LCD screen. Check star sharpness in the corners and center of your frame. If stars appear soft, refine your focus and test again.
Using focus peaking:
Some cameras offer focus peaking, which highlights in-focus areas with colored overlays. Enable focus peaking in your camera menu, then adjust focus until stars light up with the colored highlight.
The infinity focus method:
Many photographers simply set their lens focus ring to the infinity mark. However, lens infinity marks are often inaccurate, especially on zoom lenses. True infinity focus usually sits slightly before the infinity mark on most lenses.
Focus and recompose technique:
Once you achieve perfect focus, secure your focus ring with gaffer tape or a rubber band to prevent it from shifting accidentally. This is especially important if you’re changing compositions or your lens has a loose focus ring.
Some photographers mark their lens barrel with a piece of tape or paint to indicate the perfect focus position for stars. This allows you to return to focus quickly when shooting in the field.
Dealing with focus shifts:
Temperature changes can cause focus shift as lens elements expand or contract. If you notice your stars becoming softer as the night gets colder, recheck your focus every hour or when temperature drops significantly.
Common Mistakes Beginners Make When Photographing Stars
Learning from common mistakes accelerates your progress in astrophotography. Here are errors that almost every beginner makes:
Using autofocus: Autofocus doesn’t work in darkness. Your camera hunts endlessly without achieving focus, or worse, focuses on infinity incorrectly. Always switch to manual focus for star photography.
Forgetting to turn off image stabilization: When your camera sits on a tripod, image stabilization actually causes blur by trying to compensate for movement that doesn’t exist. Turn it off before starting your session.
Shooting in JPEG format: JPEG files discard most of the image data your camera captures. Stars and the night sky require heavy post-processing to bring out details. Always shoot in RAW format.
Not checking focus between shots: Focus can shift from lens creep, temperature changes, or accidentally bumping your focus ring. Review your images at 100% magnification every few shots to ensure stars remain sharp.
Underexposing images to avoid noise: Many beginners fear noise and underexpose their images intentionally. However, severely underexposed images lose detail and create worse noise when you brighten them in post-processing. Expose properly, even if it means accepting some noise.
Shooting when the moon is bright: A half moon or fuller creates so much light pollution that it washes out the Milky Way and faint stars. Always check moon phases before planning your shoot and aim for new moon periods.
Not dressing warmly enough: Night photography means standing outside for hours in temperatures that drop significantly after sunset. Inadequate clothing ruins your experience and can be dangerous. Always overdress rather than underdress.
Using cheap, unstable tripods: A wobbly tripod causes blurry images no matter how perfect your camera settings are. Wind, uneven ground, or simply pressing the shutter button can shake an inadequate tripod during long exposures.
Shooting from light-polluted areas: You can’t overcome severe light pollution with camera settings or post-processing. If you live in a city, you must travel to dark sky areas for good astrophotography results.
Not bringing spare batteries: Cold temperatures and long exposures drain batteries much faster than normal shooting. Running out of power in a remote location ends your session prematurely.
Forgetting a flashlight: Fumbling with camera settings in complete darkness is frustrating and inefficient. Always bring a red headlamp that preserves your night vision while allowing you to see your equipment.
Not practicing before important events: Meteor showers, eclipses, and other celestial events don’t offer second chances. Practice your setup and workflow multiple times before attempting to photograph time-sensitive events.
Professional Tips for Better Star Photography
These advanced techniques will elevate your star photography from good to exceptional.
Scout locations during daylight: Visit your shooting location during the day to find interesting foreground elements and identify potential hazards. Plan your compositions before darkness falls so you can work efficiently at night.
Include interesting foregrounds: The most compelling star photos combine the night sky with compelling landscape elements. Mountains, trees, rock formations, water reflections, or buildings add context and scale to your images.
Use light painting selectively: A flashlight or LED panel can illuminate foreground elements during your exposure. Cover your light source with a warm gel filter for more natural-looking results. Paint your foreground with sweeping motions rather than pointing the light directly at subjects.
Shoot panoramas for higher resolution: Take multiple overlapping images and stitch them together in post-processing. Panoramas create massive files with incredible detail and allow you to print much larger than single frames.
Stack multiple exposures: Shoot 10 to 20 identical exposures of the same composition, then stack them in specialized software like Starry Landscape Stacker or Sequator. Stacking reduces noise dramatically while preserving star and landscape detail.
Watch your histogram: The histogram for star photos should show most data in the left third with a spike at the far left representing the black sky. If your histogram bunches in the center or right side, you’re overexposing.
Bracket your exposures: Take the same shot at different exposure levels by adjusting ISO or shutter speed. This gives you options in post-processing and ensures you capture the best possible exposure.
Consider foreground and sky separately: Advanced astrophotographers often take one exposure for the foreground with different settings than the sky exposure, then blend them in post-processing. This technique maximizes quality in both elements.
Join the astrophotography community: Online forums, local astronomy clubs, and photography groups provide valuable feedback, location recommendations, and inspiration. Learning from experienced astrophotographers accelerates your progress.
Keep detailed notes: Record your camera settings, location, time, and moon phase for each session. Over time, these notes help you understand which settings work best in different conditions.
Be patient and persistent: Cloud cover, weather, and travel distances make astrophotography challenging. Some nights produce no usable images despite perfect planning. Persistence and repeated attempts eventually lead to success.
Post-Processing and Editing Your Star Photos
Even perfectly captured star photos require post-processing to reveal their full potential. RAW files appear flat and dull straight from the camera, but they contain tremendous detail that editing reveals.
Essential editing software:
Adobe Lightroom is the most popular choice for astrophotography editing. It offers powerful tools specifically useful for star photos, including graduated filters, radial filters, and targeted adjustment brushes.
Adobe Photoshop provides advanced capabilities for stacking multiple exposures, removing noise, and blending foreground and sky exposures.
Specialized astrophotography programs like Starry Landscape Stacker, Sequator, or DeepSkyStacker excel at combining multiple exposures to reduce noise.
Basic editing workflow:
Start by adjusting white balance to create natural-looking star colors. Move the temperature slider toward the cooler side (4000K to 4500K) and adjust tint slightly toward magenta to counteract green color casts from light pollution.
Increase exposure if your image appears too dark, but avoid making the sky unnaturally bright. The night sky should remain dark with visible stars, not a gray or blue background.
Increase contrast to separate stars from the sky background. Use the contrast slider cautiously as too much contrast can create an unnatural look.
Adjust highlights, shadows, whites, and blacks to reveal detail in both the Milky Way and any landscape elements. Generally, you’ll reduce highlights slightly, lift shadows moderately, and adjust blacks to keep the sky dark but not completely black.
Increase clarity and texture moderately to enhance star definition and Milky Way structure. Excessive clarity creates halos around bright stars and an overly sharp, artificial appearance.
Boost vibrance and saturation carefully to bring out colors in the Milky Way and stars. The Milky Way contains subtle yellows, oranges, blues, and magentas. Don’t oversaturate to the point where the image looks fake.
Reduce noise using your software’s noise reduction tools. Balance noise reduction with detail preservation because aggressive noise reduction can make stars appear soft and mushy.
Sharpen selectively using masking to apply sharpening only to stars and the Milky Way, not to the sky background where sharpening amplifies noise.
Advanced techniques:
Use graduated filters to darken light pollution on the horizon or brighten the Milky Way core selectively. Radial filters can emphasize specific areas of interest in your composition.
Apply dehaze to increase contrast and definition in the Milky Way. The dehaze slider is incredibly powerful for astrophotography but can introduce unwanted color shifts when overused.
Use the HSL panel to adjust individual colors. For example, reduce orange tones from light pollution, enhance blue tones in the night sky, or adjust magenta tones in nebulae.
Create star masks in Photoshop to apply adjustments exclusively to stars. This allows you to make stars more prominent without affecting the sky background.
Consider using the Orton effect, which creates a subtle glow around stars and adds a dreamlike quality to images. This technique involves duplicating your layer, applying Gaussian blur, and blending it with the original at low opacity.
Frequently Asked Questions
How do I set up a DSLR to take photos of the stars if I’ve never done astrophotography before?
Start by mounting your DSLR on a sturdy tripod and switching to manual mode. Attach your widest aperture lens (f/2.8 or faster if possible). Set your aperture to its widest setting, ISO to 3200, and shutter speed to 20 seconds. Switch to manual focus, use Live View to zoom in on a bright star, and adjust focus until the star appears as the smallest possible point. Take a test shot and review it at 100% magnification to check focus and exposure. Adjust settings as needed and start shooting.
How do I set up a DSLR to take photos of the stars without getting blurry images?
Blurry star images result from camera shake, poor focus, or star trailing from exposures that are too long. Eliminate camera shake by using a sturdy tripod and remote shutter release or your camera’s self-timer. Achieve sharp focus by switching to manual focus and carefully focusing on a bright star using Live View magnification. Prevent star trailing by following the 500 Rule: divide 500 by your lens focal length to determine the maximum shutter speed before stars begin to trail.
What camera settings should I use for photographing the Milky Way?
For Milky Way photography, use these settings as a starting point: aperture f/2.8 or wider, shutter speed 20 to 25 seconds (calculated using the 500 Rule), and ISO 3200 to 6400. Shoot in RAW format, disable image stabilization, and focus manually on a bright star. Adjust ISO based on your camera’s noise performance and how dark your sky is. Slightly longer shutter speeds work in very dark locations, while shorter speeds prevent overexposure in areas with light pollution.
Can I photograph stars with a kit lens?
Yes, you can photograph stars with a kit lens, though results won’t be as impressive as with faster, wider lenses. Most kit lenses have maximum apertures around f/3.5 to f/5.6, which means they gather less light than faster lenses. Compensate by increasing your ISO to 6400 or higher and using the longest shutter speed possible before star trailing occurs. You’ll see fewer faint stars and more noise, but you can still capture the brightest stars, constellations, and the Milky Way core under very dark skies.
How do I set up a DSLR to take photos of the stars in my backyard?
Even with light pollution, you can photograph bright stars, planets, and the moon from your backyard. Use manual mode with aperture wide open, shutter speed around 10 to 20 seconds, and ISO 1600 to 3200. You won’t capture the faint Milky Way details visible from dark sky locations, but you can still photograph constellations, meteor showers, and create star trail images. Consider using light pollution filters designed for astrophotography, which help reduce the orange glow from sodium lights.
What’s the best time of night to photograph stars?
The best time depends on what you’re photographing. For the Milky Way, shoot during the few hours after astronomical twilight ends in the evening or before astronomical twilight begins in the morning. The darkest skies occur in the middle of the night when the sun is furthest below the horizon. Shoot during the new moon phase when no moonlight washes out faint stars. The Milky Way core is visible from March through October in the Northern Hemisphere, with peak visibility in June, July, and August.
How do I focus my DSLR on stars when it’s too dark to see through the viewfinder?
Use your camera’s Live View mode to see the LCD screen instead of looking through the viewfinder. Find the brightest star or planet visible, then use Live View magnification to zoom in digitally on that star. Switch your lens to manual focus and slowly adjust the focus ring while watching the magnified star on your LCD screen. The star appears sharpest when it’s the smallest, tightest point of light. Take a test shot and review it at 100% magnification to verify focus before continuing with your session.
Do I need an expensive camera to photograph stars?
No, any DSLR camera can photograph stars. Newer cameras with better high ISO performance produce cleaner images with less noise, and full-frame cameras perform better in low light than crop sensors, but even entry-level DSLRs capture beautiful star photos. Your lens matters more than your camera body. A budget-friendly DSLR paired with a fast wide-angle lens produces better results than an expensive camera with a slow kit lens. Focus on getting a lens with f/2.8 or wider aperture before upgrading your camera body.
Conclusion
Learning how do I set up a DSLR to take photos of the stars opens up an exciting dimension of photography that connects you with the cosmos in ways you never imagined. While the technical aspects might seem overwhelming initially, with practice, adjusting your camera settings becomes second nature.
Remember that successful star photography requires three key elements: the right camera settings (wide aperture, high ISO, and appropriate shutter speed based on the 500 Rule), a dark sky location away from light pollution, and sharp manual focus. Master these fundamentals before moving on to advanced techniques.
your DSLR, mount it on a tripod, find the darkest location accessible to you, and begin experimenting. Each night under the stars teaches you something new about your camera, the night sky, and the incredible universe surrounding us.
Your first star photos might not match the stunning images you’ve seen online, but persistence and practice will steadily improve your results. Keep shooting, keep learning, and most importantly, enjoy the experience of spending nights under the stars with your camera. The universe is waiting for you to capture its beauty.

Abdullah Zulfiqar writes about technology in a simple, practical way, helping readers stay updated and make smarter decisions in an ever-evolving digital world.